The Flat Belly Yoga workout
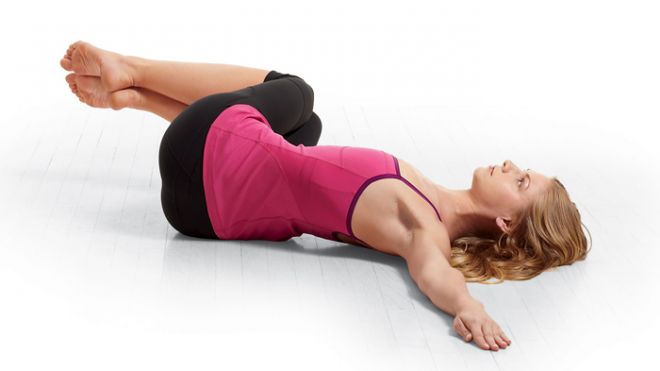
The Flat Belly Diet! has always promised a flatter belly, no crunches required. We still make good on that promise. In addition to following a diet rich in healthy fats like avocado, nuts and seeds and olive oil, we’ve now added a yoga component to the program with Flat Belly Yoga!  Your Guide to a Flatter Belly The plan takes the “work”out of working out and offers a hybrid yoga approach that incorporates hand weights and a cardio walking schedule to burn belly fat. The bulk of the plan is a 28-day workout, but first, Kimberly has designed a 4-day jump start to prep you for the next 28 days. We're sharing that jump start with you right here! If you like it, we encourage you to try the 28-day plan by joining the Flat Belly Diet! online community or ordering the book or DVD. The jump start combines low-intensity yoga with walking cardio sessions to get you off the couch and moving around. The yoga portion of the jump start, also known as Yoga for Your Core, starts with just a few simple, straightforward moves that happen to be some of Kimberly’s favorite easy stretches. Let's get started! Heart Walks There are two types of walking workouts featured in the Flat Belly Yoga! workout. If you want to lose belly fat, your walks need to be real workouts, which means we need to get your heart rate up. Your aerobic program will include both steady pace and interval walks. The first type of walking is called Fat Blast. That's a fast-paced walk, meaning it's not leisurely. You will increase the distance you walk every week. The second type of walk is called Calorie Torch. This is an interval walk, meaning it shifts back and forth between a fast-paced walk and a series of high-intensity “bursts” in which you will be walking at a brisk pace. You'll start with a steady, fast-paced walk, and then you'll shift gears by moving into what I call a pick-me-up pace, which is your high-intensity pace. The Calorie Torch incorporates intervals because it's unhealthy to maintain an extremely high level of intensity for the entire workout, unless you're a professional athlete. YOUR 4-DAY SCHEDULE Each day's yoga routine is the same, but the walks vary in time and intensity. Day 1 Fat Blast Walk, 20 minutes • 3-minute warm-up • 15-minute fast pace • 2-minute cool-down Yoga for Your Core, 15 minutes Day 2 Calorie Torch Walk, 15 minutes • 3-minute warm-up • 10-minute fast pace with three 1-minute pick-me-ups • 2-minute cool-down Yoga for Your Core, 15 minutes Day 3 Fat Blast Walk, 20 minutes • 3-minute warm-up • 15-minute fast pace • 2-minute cool-down Yoga for Your Core, 15 minutes Day 4 Calorie Torch Walk, 15 minutes • 3-minute warm-up • 10-minute fast pace with three 1-minute pick-me-ups • 2-minute cool-down Warm-Up/Breath Work For the daily yoga part of this workout routine, we start with this pose. Sit in a cross-legged position, using your core to keep your back straight. Close your eyes and take a deep breath. Breathe in through your nose and out through your mouth. Let's do this three times. Take a deep breath in and see if you can hold it for a few seconds. Then let it go. Repeat this one more time Easy Spinal Twist A:  Bring your knees together and roll down onto your back. Hug your knees into your chest and gently rock side to side, massaging your lower back. B:  Keep your right knee into your chest and move your left leg straight out on the floor. C:  Take a deep breath in. On your exhale, bring your right knee across your body toward the left side of the room while keeping your shoulder blades on the floor. Then bring your right arm straight out from your shoulder and look to the right. Hold the stretch for 30 seconds, then switch sides. To do this, both knees should come back into your chest. This time your left knee stays in and your right leg goes straight onto the floor. Bring your left knee toward the right side of the room with your left arm straight out from your shoulder. Look out over your left shoulder. Take a second to notice if there was a difference between one side and the other. Hold for 30 seconds, then bring both knees to your chest. Tip: Don't try to force your knee down with your hand. This will lift your shoulder blade off the floor. Rock Up To Standing A:  Lying on your back with both knees at your chest, rock back and forth from your shoulders to your hips. B:  Once you get up the momentum, rock up onto your feet and stand up. This takes a lot of core strength, so you can make it easier by using your hands to push yourself up. 14 Walking Workouts To Boost Energy And Burn Fat Chair Pose From a standing position, bring your legs together with your feet touching. Sink your hips back like you are about to sit on a chair and bring your arms above you, holding them straight up next to your ears. Hold for 45 seconds to 1 minute. If you want to challenge yourself more, try to shift a little more weight onto your heels. This engages your core muscles and works on your balance. Tip: This pose requires a lot of core strength, so if you're having difficulty, you can make it easier by not sinking your hips as far down. To do this, pretend like you are trying to sit on a bar stool instead of a chair. Warrior 1 Starting from the previous Chair Pose, come back up to a standing position. You can shake out your legs if you feel the need. A:  Step your left leg back about 3 feet and bend your right knee to a 90-degree angle. Try to point your back toes slightly forward while keeping your heel pressed down. B:  Then bring your arms up toward the ceiling. The goal in this pose is to have your thigh parallel to the floor. You want to feel as if you are trying to reach the ceiling with your fingertips as you sink down with your lower body. Keep your upper body straight and hold for one minute. Come back up to a standing position. Now step your right leg back 3 feet and bend your left leg to a 90-degree angle. Bring your arms straight up toward the ceiling. Hold for one minute. Take a second and try to notice if there was a difference between one side and the other. One of your goals, besides gaining a flat belly, is to balance out your body to prevent injury and create symmetry. Hero Pose With A Lift A:  Come down to the floor with your knees together and sit on your feet. Rest your hands on top of your thighs. Take a deep breath in. B:  On your exhale, begin to lift your arms as you raise yourself up onto your knees. C:  Once you are on your knees and your hands are pointed up toward the ceiling, slowly lower yourself back down to your starting position. Do this five times Seated Tree—Up And Over Swing your legs out in front of you and shake them out. A:  Bring your right foot to the inside of your left leg. Place your right hand on the mat or floor beside your right hip for support. B:  With your left arm, reach up and over your head toward the right side of your body and then back down to shoulder height. Make sure you're sitting up straight. Repeat this five times, inhaling as you reach up and exhaling as you bring your arm back down. We will be doing this pose with weights during the 4-Week Workout, so I want to make sure you get your form down now. After you have done this five times, switch sides. Your left foot should come to the inside of your right leg. Bring your left hand beside your left hip for support, while your right hand comes up and over toward your left, and then back down to shoulder height. Do this five times slowly. Sitting up straight will help you focus on your core. If you can't sit up straight, you can modify the pose by not reaching up and over so far. Or you can sit up on a folded blanket, which helps to keep you from slouching. Tip: Try to get your foot to the inside of your thigh. If you have trouble, just bring your foot to your knee (or to your calf) to modify the pose. Windshield Wiper A:  Next, bring your knees together and roll down onto your back. Bring your arms straight out so that they are parallel to your shoulders. While keeping your head and neck straight, look up at the ceiling. B:  Take a deep breath in and on your exhale, lower your legs while pointing them toward the right side of the room. Hover your legs about 2 or 3 inches from the floor. C:  Take a deep breath in and on your exhale, switch so that your legs are pointed toward the left side of the room. Do this five times on each side. Be sure to keep your upper back pressed to the floor. This pose works your obliques--the sides of your body. Once you've completed this pose, hug your knees into your chest and rock side to side. Bridge With A Lift A:  While lying on your back, place your feet on the floor with your knees bent, and bring your feet hip-distance apart. Take a deep breath in. B:  On your exhale, push into your feet to lift your hips toward the ceiling. Once your hips are up, bring your arms underneath your body and clasp your hands together. Try to roll your shoulder blades together and raise your chest toward your chin while keeping your hips raised toward the ceiling. Release your arms and slowly lower your hips down to the floor. C:  Repeat, but this time bring your arms over your head. Once the back of your hands touch the floor behind your head, bring them back down to where they started. Really focus on your core/abs when you are doing this pose. Do this one more time. Once you're finished, hug your knees into your chest and rock side to side. Easy Spinal Twist This time, you're going to hold the pose for 45 seconds. A:  Bring your knees together and roll down onto your back. Hug your knees into your chest and gently rock side to side, massaging your lower back. B:  Keep your right knee into your chest and move your left leg straight out on the floor. C:  Take a deep breath in. On your exhale, bring your right knee across your body toward the left side of the room while keeping your shoulder blades on the floor. Then bring your right arm straight out from your shoulder and look to the right. Hold the stretch for 45 seconds, then switch sides. To do this, both knees should come back into your chest. This time your left knee stays in and your right leg goes straight onto the floor. Bring your left knee toward the right side of the room with your left arm straight out from your shoulder. Look out over your left shoulder. Take a second to notice if there was a difference between one side and the other. Hold for 45 seconds, then bring both knees to your chest. Remember: Don't try to force your knee down with your hand. This will lift your shoulder blade off the floor Corpse Take a deep breath in. On your exhale, lie on the floor with your palms facing up and your eyes closed. Take a deep breath in through your nose and exhale from your mouth. Take two more deep breaths and just let your whole body relax onto the floor. Hold this pose for two minutes. Then roll onto your right side and push yourself up to a seated position. Take a second to evaluate how you feel. This concludes your series of daily yoga poses for your Flat Belly Yoga 4-Day Jump Start! More Exercises for Flatter Abssource : http://www.foxnews.com/health/2013/05/31/flat-belly-yoga-workout/